Discover the essential steps to troubleshoot your sump pump effectively and keep your basement dry. Follow this comprehensive guide to address any issues and ensure your sump pump is in optimal working condition.
Understanding the Importance of a Sump Pump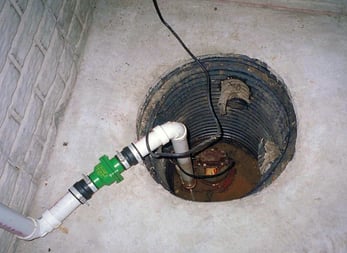
A sump pump is crucial in keeping your basement dry and preventing water damage. It is designed to remove excess water that accumulates in a sump pit, which is a hole dug in the lowest part of your basement or crawl space. Without a functioning sump pump, water can seep into your basement, causing mold, mildew, and structural damage.
During heavy rains or when the water table rises, groundwater can enter your basement through cracks in the foundation or gaps around pipes. The sump pump collects this water in the sump pit and pumps it out to a designated drainage area, away from your foundation. This helps to prevent flooding and water damage, providing you with peace of mind.
Regular maintenance and troubleshooting of your sump pump are essential to ensure it functions properly when you need it the most. By understanding the importance of a sump pump and its role in keeping your basement dry, you can take the necessary steps to troubleshoot any issues and ensure it operates efficiently.
Identifying Common Signs of Sump Pump Issues
Before troubleshooting your sump pump, it's important to identify common signs of issues. This will help you determine if your sump pump is experiencing problems and needs attention. Here are some common signs to look out for:
1. Excessive noise: If your pump makes loud or unusual noises, it could indicate a mechanical issue, such as a worn-out motor or a clogged impeller.
2. No water discharge: If your pump is running, but no water is being discharged, it may be due to a clogged discharge pipe or a malfunctioning float switch.
3. Frequent cycling: If your pump turns on and off frequently, it could be a sign of a high water table, a malfunctioning float switch, or an undersized sump pump.
4. Foul odor: If you notice a foul odor coming from your sump pit, it may indicate stagnant water or a buildup of debris, which can affect the pump's performance.
By being aware of these common signs, you can quickly identify any issues with your sump pump and take the necessary steps to troubleshoot and resolve them.
Step 1: Checking Power Supply and Electrical Connections
The first step in troubleshooting your sump pump is to check the power supply and electrical connections. Here's what you need to do:
1. Ensure the sump pump is plugged in: Check if the sump pump is properly plugged into a grounded electrical outlet. Sometimes, the plug can come loose or get disconnected accidentally.
2. Check the circuit breaker: Verify that the circuit breaker for the sump pump is in the 'on' position. If it has tripped, reset it and monitor the pump to see if it starts working.
3. Test the outlet: If the sump pump is plugged in and the circuit breaker is on, but it still doesn't work, try plugging another device into the same outlet to see if it receives power. If the outlet is faulty, you may need to call an electrician to fix it.
By checking the power supply and electrical connections, you can rule out any issues related to power and ensure that your sump pump is receiving the necessary electricity to operate.
Step 2: Inspecting the Float Switch and Pit
The float switch is an important component of a sump pump as it controls the pump's operation based on the water level in the pit. If the float switch is stuck or malfunctioning, it can prevent the sump pump from turning on or off when necessary. Here's how to inspect the float switch and pit:
1. Remove any debris: Check the sump pit for any debris or objects that may be obstructing the float switch or impeding its movement. Clear away any debris to ensure the float switch can operate freely.
2. Test the float switch: Fill the sump pit with water manually and observe the float switch's movement. It should rise as the water level increases and trigger the sump pump to turn on. If the float switch doesn't move or the pump doesn't activate, the float switch may need to be repaired or replaced.
3. Clean the pit: If the float switch and pit are clear of debris but the pump still doesn't work, it may be due to a buildup of sediment or sludge in the pit. Use a wet-dry vacuum or a bucket to remove any accumulated sediment, ensuring proper water flow to the pump.
Inspecting the float switch and pit is crucial to ensure that the sump pump can detect rising water levels and activate when needed. By cleaning and testing these components, you can troubleshoot any issues related to the float switch and pit.
Step 3: Testing the Sump Pump's Operation
To test the operation of your sump pump, follow these steps:
1. Fill the sump pit: Pour water into the sump pit until the water level is above the float switch. This should trigger the sump pump to turn on and start pumping water out of the pit.
2. Monitor the pump: Observe the sump pump as it operates. Check for any unusual noises, vibrations, or leaks. Ensure that the water is being pumped out of the pit and discharged properly.
3. Test the automatic shut-off: Once the water level in the sump pit decreases, the float switch should lower, causing the sump pump to shut off automatically. Ensure that the pump stops running when the water level drops.
By testing the sump pump's operation, you can determine if it is functioning correctly and effectively removing water from the pit. If any issues are identified during the testing process, proceed to the next step for further troubleshooting.
Step 4: Cleaning and Maintaining the Sump Pump
Regular cleaning and maintenance are essential to keep your sump pump in optimal working condition. Follow these steps to clean and maintain your sump pump:
1. Disconnect the power: Before performing any cleaning or maintenance tasks, make sure to unplug the sump pump from the electrical outlet to avoid any accidents.
2. Remove the pump: Carefully lift the sump pump out of the pit and inspect it for any signs of damage or wear. Clean the pump using a soft brush or cloth to remove any dirt, debris, or sediment.
3. Clean the impeller and screen: Check the impeller and screen for any clogs or obstructions. Use a toothbrush or a small brush to remove any debris that may be affecting the pump's performance.
4. Check the discharge pipe: Inspect the discharge pipe for any clogs or blockages. If necessary, remove any obstructions and ensure that the pipe is securely connected to the pump.
5. Reassemble and test: Once you have cleaned all the components, reassemble the sump pump and place it back into the pit. Follow the testing steps mentioned in Step 3 to ensure that the pump is functioning properly after cleaning.
By regularly cleaning and maintaining your sump pump, you can extend its lifespan and prevent potential issues. It is recommended to perform these maintenance tasks at least once a year or as recommended by the manufacturer.
.png)