 Let us guess: this spring, when you finally got those first few seedlings planted, you went to turn on your hose to give them their first drink... and suddenly water started spurting out of the top of your spigot’s handle, watering you instead of your petunias.
You try re-fastening your hose to the spigot and tightening the handle, but no luck. You still get wet.
It was working fine last summer! you think. What happened?
Was this you? If so, how did we know? Actually, chances are there are a lot of people having this issue right now.
Why garden spigots leak in the spring
To figure out what went wrong with your hose setup, don’t look back to last summer. Look back to this past winter.
This winter, we had a record-breaking winter with a lot of hard freezes—for several days in a row, the temperature hardly got above freezing.
This kind of harsh weather can not only freeze your pipes (which is a big mess); it can also wreak havoc on your outdoor spigots (which, thankfully, is only a little mess).
There’s a good chance that all that’s gone awry is nothing more than a broken washer or O-ring. Parts made of rubber or plastic and more likely to crack in extreme temperatures.
Fortunately, this is a pretty cheap and easy fix!
How to fix a leak in your garden spigot
As with repairing a leaking faucet, the basic way to fix this is pretty simple:
- First, just try tightening the nut around the handle with a wrench. In some cases, that’s all it needs. If it still leaks, proceed with the following steps.
- Turn off the water. Seriously, don’t forget this step, or you could water EVERYTHING in your yard, and waste a good deal of money. Once the water’s off, turn the faucet on in order to drain the remaining water.
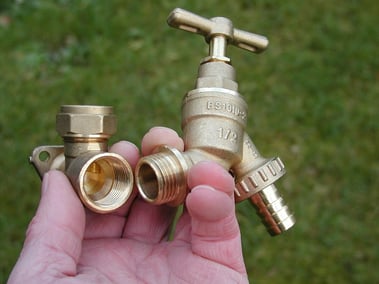
- Carefully unscrew and disassemble all parts of the handle (making careful note of what order everything goes in). You may need a heavier pipe wrench in order to get enough pressure to turn older or corroded pieces—just be careful not to damage anything!
- Look for anything that’s cracked, rusted or broken. Pay special attention to the rubber washers on either side of the valve stem. If they’re cracked or have worn away, you’ve probably found the source of the problem.
- If the handle’s not the problem, try disassembling the spigot itself and doing the same
- Head to the home improvement store with the worn-out piece(s), and purchase their exact replacements.
- Replace the broken pieces, re-assemble everything, make sure it’s all good and snug, and try turning the water back on again.
Hopefully at this point the problem should be fixed and you’ll be able to water your garden without watering yourself too.
If your leak persists, or if the problem has somehow gotten worse, you may need to get a professional to take a look. You can call Ken’s Plumbing at (864) 242-5511 any time of the day or night, any day of the week.

.png)